How to securely erase a USB drive on a Mac
Formatting and erasing are not the same thing. Here is what each gives you and where an overwrite reaches its limit.
In short
- A quick format creates an empty file system. Earlier files disappear from view but can still be recovered.
- To keep ordinary software from bringing the data back, you have to overwrite the whole drive and verify the result.
- On flash memory and SSDs the drive itself decides where data lives, so a software overwrite does not prove that every copy is destroyed. For truly sensitive data you need encryption from the start, or physical destruction.
What Disk Utility does
In Disk Utility, Erase creates a new file system. Security options for erasing are not offered for every kind of drive — for flash drives and SSDs there are usually none; check in your macOS version. Do not treat a plain Erase as a way to destroy data.
What “erased” means by the standard
NIST SP 800-88 Rev. 2 distinguishes levels. Clear is a software overwrite of all addressable areas through the drive’s ordinary interface, followed by verification. Purge uses the drive’s own commands (ATA Sanitize, Secure Erase, NVMe Sanitize) or cryptographic erase. Above that is physical destruction. Which level is enough for your data is for you or your organization to decide.
Why flash drives and SSDs have a limit
A flash controller spreads wear and swaps blocks. Some areas — hidden, remapped, spare — are out of reach of an ordinary overwrite. So after a software overwrite you cannot claim the data is impossible to extract with laboratory methods. If the drive held something you are answerable for to a law or a client, the right answer is to encrypt from day one and destroy the drive physically at the end of its life.
How Disk Fusion does it
- Connect the drive and select it in the list. Check the name and size: erasure is irreversible.
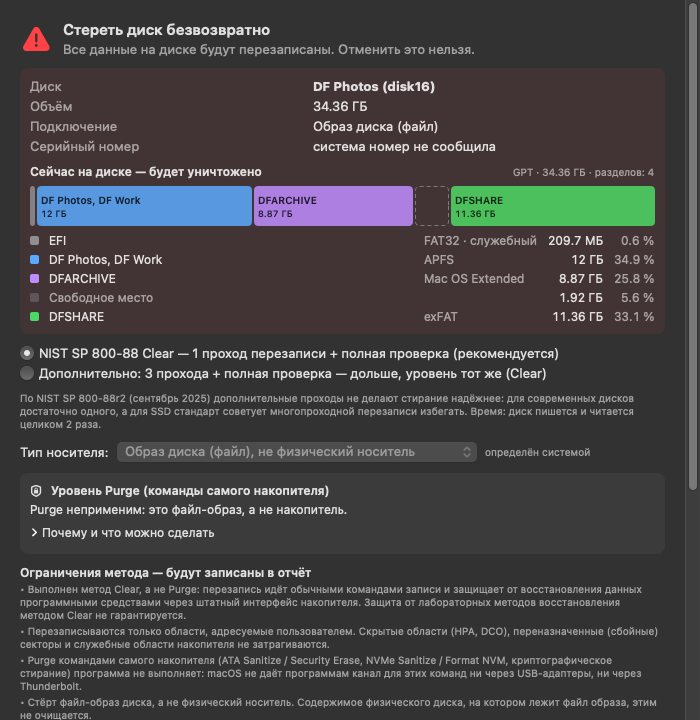
- Click “Erase Disk” (Pro). The window shows what is on the disk now and will be destroyed.
- Choose a method: Clear — one pass plus full verification (recommended), or three passes plus full verification (slower, same level — Clear).
- Read the “Method limitations” block: exactly these points are written into the certificate.
- Type the confirmation word ERASE.
- Wait for it to finish: the disk is written and read in full, so it will not be quick.
- If the whole device was overwritten and verified, the app creates a PDF certificate. If erasure was interrupted or verification failed, you get a report that says so — not a certificate.
What the certificate does not say
- That the method is sufficient for your data, industry, contract or regulator.
- That areas the drive does not expose were erased: remapped blocks, hidden areas, spare flash capacity.
- That the drive’s own commands were run. Disk Fusion does not run ATA Sanitize, Secure Erase or NVMe Sanitize: macOS gives apps no channel for them (the app explains this for the specific disk).
- That the app or the certificate is approved by NIST: NIST does not certify products.
- That the data cannot be recovered by laboratory techniques.
What you type into the certificate by hand (operator, organization, serial number) is recorded as entered and is not verified.
What the app will not do
It does not erase or format the built-in system disk — however hard you ask. The erase-mark check (Lite) lets you see whether the app left a mark on an external disk: a certificate number, a date and a method.